It’s a well-known fact that no matter how fancy and comfy your chair is, sitting too long can take its toll on your health.
Adjustable standing desks have become an increasingly popular tool because it allows you to reap health benefits by alternating sitting and standing positions.
Maybe you know? There are many famous people in history who worked while standing. Examples include Thomas Jefferson, Ernest Hemingway, Leonardo da Vinci and Charles Dickens, to name a few. The hand crank they used at the time was the first way to adjust the height of a desk. Over time and improvements in technology, methods of adjusting desk height have evolved, and the most popular model now is the electric standing desk, which makes height adjustment an efficient affair.
Standing desks are no longer the traditional and boring office desks you might
think. It comes in a growing number of styles that are suitable for gamers or artists, and can even blend in with modern decor.
How to Make?
If you want to transform your home office into an amazing workstation, start by adding an electric standing desk.
To build a DIY motorized standing desk, you need to organize your ideas first. The key to getting the best setup for you is to take measurements, analyze all your options, and be creative!
Step 1 – Take A Measurement
Measure the appropriate height range so that it can accommodate everyone who might use the desk, from children to adults. As well as the daily load-bearing requirements to avoid instability caused by the overload. Also, measure the workspace where the desk will be placed to make sure the size fits.
Step 2 – Choose A Standing Desk Frame
The frame of your DIY electric standing desk is the foundation of your complete setup, take the time and patience to choose a height-adjustable, ergonomic desk frame.
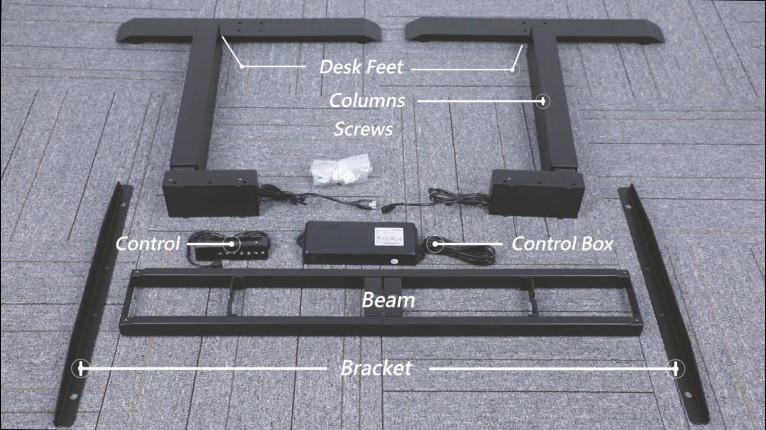
Your desk frame is best made of durable materials to ensure it will last a long time. Aoke’s desk frames are all made of cold-rolled steel, with stable structure and strong bearing capacity. There are three colors of black, white and gray to choose from, which can meet the collocation needs of most people. Columns, feet, handsets and control boxes are also available in a variety of models, which can be selected according to individual needs.
Step 3 – Select The Matching Desktop
You need to calculate the size of the desktop that the desk frame is suitable for, and then choose the appropriate desktop material and color according to your space style. You’re going to spend a lot of time doing your work and putting things on it, so it’s important to choose a desktop that you like.
Step 4 – Assemble The Electric Standing Desk
Now that you’ve selected your standing desk frame and desktop, it’s time to start building your own DIY electric standing desk. Although different models of sit stand desk frame are assembled a bit differently, the general instructions will give you an idea of how it’s done. DIY electric standing desk is not difficult, as long as you have the right tools and follow the steps carefully, the assembly process will take about 20 minutes, and you can easily get a height adjustable desk!
1.Prepare tools. Usually, all you need is a set of Allen keys, Phillips screwdriver and zips.
2.Read the installation manual carefully. Upon receipt, remove all parts from the packaging, check for completeness, and then arrange them for assembly.
3.Find a flat surface and put the beam through two columns and fix the standing desk control box position.
4.Install the feet on top of the sit stand desk lifting columns, and mount the bracket on the beam, fix them with screws M6.
5.Insert the rubber pads into the holes.
6.Lay the desktop face down on a soft surface, making sure it doesn’t scratch.
7.Place the assembled motor or crank adjustable table frame at the corresponding position at the bottom of the desktop, then loosen the screws on the beam, adjust the desk frame to the appropriate width, and then tighten the screws M6.
8.Insert the plastic pads into the rubber pads.
9.Align the holes on the brackets with the pre-drilled holes in the bottom of the desktop. If your desktop doesn’t have pre-drilled holes, you will need to drill them before attaching the desk frame. We highly recommend using a drill bit with a depth stop so you don’t accidentally drill through your desktop.
10.Mount the adjuatable desk control box on the bottom of the desktop and connect to the desk motors.
11.Install the handset by aligning it with the holes at the edge of the desktop. Again, if you have a custom desktop, you’ll need to measure and drill them yourself.
12.Connect the handset to the control box. You can use zips to organize cables.
13.Long press the up and down buttons to reset the handset.
Now your DIY workstation is complete, just flip the desk over, plug your new workstation into a power outlet, and you’re ready to go!


